
Planting Easter Flowers – Long Lasting Beauty!
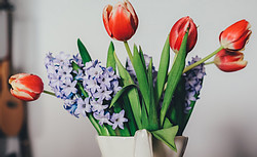

It’s that time of year when the world falls in love with all the beautiful flowers bursting from the ground after a long winter’s nap. Easter is a time of awakening and being thankful for all the blessings we have in our lives. What better way to show gratitude for our amazing earth than to give Easter flowers to loved ones and to receive them too! We all would like to live forever, but while that is not possible for us, you can sustain life and beauty by planting Easter flowers.
(Some of the links within this post are affiliate links of which I receive a small compensation from sales of certain items.)
A Little Background
Did you ever wonder how the tulips, hyacinths, daffodils and lilies can bloom and look so beautiful in garden stores so early in the spring? I’m sure that, like mine, your garden bulbs are only starting to poke their heads out of the ground, so how can this be? The process is called forcing. It’s a way of tricking the bulbs to grow and bloom even when it’s not quite spring. This is a specific process nurseries use to encourage bulbs to blossom.
They begin by potting the bulbs in a well drained container filled with fertile soil. They are then placed in a cool (40 – 50 degrees) but not freezing area without sunshine. The bulbs are kept there for 4 to 8 weeks depending on the type of bulb being planted. Once they begin to show signs of life, they are brought into a warm and light filled room.
This process results in beautiful blooms well before their usual outside dates for blossoming.
This is why you can buy them so early at your local garden center.
Now, what to do with them??

Options For Your Glorious Easter Flowers – Enjoy!
As I see it, you have three options for your lovely gifts.
-
Enjoy them and then throw them away. (Boooo, Never!)
-
Plant them in your garden straight away. (Risky, but may work!)
-
Pamper the little tykes and plant them in the fall. (Least risky.)
I do not regard number one as a viable option, however, if you must, follow these instructions. If you are purchasing the flowers, buy ones with tight bulbs (not opened). Keep them out of direct sunlight but in a cool and bright room. The direct sunlight causes photosynthesis which helps the plant grow. “Photosynthesis is used by plants and other organisms to convert light energy into chemical energy that, through cellular respiration, can later be released to fuel the organisms metabolic activities.” hence, growing and blossoming.
By keeping the flower out of direct sunlight and in a cool location, you will slow down the blooming process and enjoy your flowers a little longer. Also, do not over water them. If they come in a foil wrap, poke some holes in the bottom and place the pot on a dish. Do not allow them to sit in water.

One Viable Option: But I Want To Plant Them Now!!!
If you are super anxious and want to get your hands dirty, I suggest you wait until after the last frost before subjecting them to cold temps. Once it is warm enough, you can plant the potted flowers in the ground with the potting soil at the same level as your garden’s soil.
(As an Amazon Associate I earn from qualifying purchases.)

Once the flowers are gone and the leaves are completely dead, remove the bulbs from the pot. Gently separate and untangle the clumping roots and plant the bulbs six inches deep and about six inches apart. Cut the stems back completely and cover with mulch. Water the area thoroughly. Mix a 10-10-10 (10% nitrogen, 10% phosphorous, 10% potassium) soluble fertilizer into the soil. Avoid spraying any kind of weed killer close to the newly planted bulbs.
This technique usually works for daffodils and hyacinths. It’s a gamble when it comes to tulips. Lilies are also tricky. Although one year I randomly stuck my lilies in the ground even before they died and they survived! I had to do this because lilies are very deadly to cats and I really love Nigel and Luna, my kitty cats! I didn’t want to risk it, even though they say cats have nine lives.
“Patience is Bitter, But It’s Beauty Is Sweet” Jean-Jacques Rousseau
If you can be patient, tending to and pampering your bulbs throughout the summer should reap very good results.

-
After the flower in the pot is dead, cut the faded bloom from the stalk.
-
Begin decreasing the water as the leaves start to yellow.
-
When the leaves are completely dead, remove the bulbs from the pots.
-
Cut off or pull out any stems from the bulb.
-
Place the bulbs in a net bag and hang them in a cool dry place.
Finally the Fall! Time For Planting!!

Ideally you want to plant your bulbs one to two months before the first frost. Google the Farmer’s Almanac and it will provide you with your area’s frost date. Gently squeeze the bulbs. If they are firm, they’re alive! Plant them in plenty of sunlight in rich drainable soil.
Planting mixes from garden stores will suffice. Add a little bone meal to the bottom of the hole before planting the bulb. There are certain tools that make digging the holes for planting easier. See the photo to the right. Space your bulbs six inches apart and six inches deep. Finally, cover the buried bulbs with mulch to protect them from harsh winters.

One Other Option For Planting Easter Flowers
Planting Easter Flowers
Instead of removing the bulbs and hanging them in a net bag, you could bring the flowers into a dry, dark place and wait for the flowers and leaves to completely die. While waiting for this to happen, give them a little drink of water on occasion. Once it is time to plant the bulbs in the fall, cut the yellowed and dead stems from the bulbs. Separate the bulbs from the soil and each other and plant in the ground following the same instructions as above.

Ok, so you’ve learned all the professional ways to preserve Easter flowers. Now here is a the lazy way which may work! As soon as you get the flowers home, take the flowers out of the pots, gently separate the roots and bulbs and plant them in containers. I have done this before and it worked. It is a gamble, though, because I’ve had some bulbs that just died and did not come back the next year.
So if you are a gambler and like a 95% probability that your bulbs will last for years to come, follow the instructions above for planting Easter flowers!

Planting Easter Flowers – Please Save Me!!
As you can see you do not have to trash your Easter flowers. Why not beautify your garden by replanting the beautiful flowers. If you do not have a garden, try planting them in a community park but first get permission from the local, county, or state park commission or authority.

I hope you’ve enjoyed this post and have learned how to preserve Easter flowers. If you have any questions or comments, please leave them below. I’d love to hear from you.
Nina