How to Grow Garlic in a Pot – The Healthy Vegetable
Yes, garlic is a vegetable, not an herb or spice. It is commonly used in a variety of dishes throughout the world. In addition to being a culinary delight, it is also beneficial to your health. Garlic is easy to grow from cloves as long as you purchase the correct kind and follow these simple instructions. Learn how to grow garlic in a pot so you will have more of this healthy vegetable year round.
(Some of the links within this post are affiliate links on which I receive a small compensation from the sale of certain items with no added expense to you.)
(As an Amazon Associate I earn from qualifying purchases.)
How to Grow Garlic in a Pot – Outdoors
If you have limited space and/or live in an apartment with a small deck or patio, then consider growing garlic in a container. Growing garlic in a pot outdoors is rather easy.
If you are growing garlic to harvest the cloves in the bulbs, limit the amount of cloves you put in each pot. Some people prefer to cut the leaves and scapes and use them in dishes such as a stir fry or salad. If you are growing garlic for this purpose, you can place more cloves in each pot as long as they are not touching. Cutting the leaves and scapes will prevent the cloves from maturing to their full size.
Plant the cloves 2 to 3 weeks before your first frost and leave them out the entire winter. They will be ready to harvest once the leaves turn yellow and brown; usually in June or July.
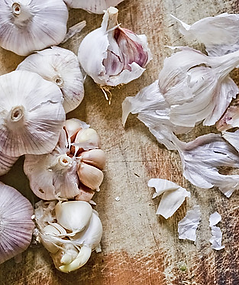
Which Garlic to Choose
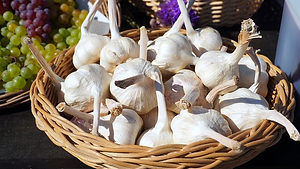
Select garlic that is organic and/or locally grown. Supermarket garlic can be sprayed with chemicals which reduce its ability to sprout, so your best bet is to purchase it from a nursery or garden center.
There are two main types of garlic; hardnecks and softnecks.
Hardnecks grow better in cold climates, whereas softnecks like warmer climates. Read How to Grow Garlic from Bulbs for more information on the different varieties of garlic.
Containers for Growing Garlic Outdoors
Regardless of the reason you decide to grow garlic, choose a container that can withstand temperature swings in winter and be sure it has good drainage. Also, choose a pot that is at least 6 inches deep if you are only growing a few cloves or 8 to 10 inches deep if you are planting more than 6 cloves.
If you choose a metal container, use a drill with at least a quarter inch drill bit to make 3 to 4 drainage holes. Clay pots with adequate drainage are good, however, they may crack outside if you live in an area with harsh winters. The same precaution applies to ceramic pots. Use special ceramic drill bits if your container has no drainage holes.
Be creative. Search your basement, garage, attic, or any storage area for containers that could be used as pots. You’d be surprised what you can find if you just think beyond typical planting pots. This will also save you money.
Soil
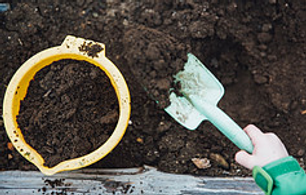
Once you have decided for which reason you are growing garlic and have chosen a pot, it’s time to prepare the soil. If your drainage holes are large where soil can easily seep through, cover them with either a coffee filter or stones found in the garden.
Garlic likes rich, well drained soil so choose a good potting soil, not topsoil or garden soil. The latter soils are too heavy and will cause the bulbs to rot.
Fill the pot with potting soil leaving 2 inches below the rim.
Placement of Cloves
Divide each bulb into cloves leaving the thin papery covering on them the day of planting.
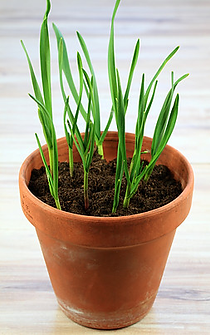
If you are growing the garlic to harvest the bulbs, place the cloves in the soil with tips up about 4 to 6 inches apart and about 2 inches deep. This will allow them to fully develop.
If you are growing the garlic only for the scapes and leaves, the cloves can be planted closer together about 2 inches apart.
Once you have placed them in the soil, cover them with a thin layer of soil. Their tips should be just below the surface and the soil level should be approximately one inch from the rim of the pot to allow for watering.
Mulching
Add a good layer of mulch on top of the soil to help retain water and keep critters from eating your bulbs.
The mulch could be either store bought (natural not dyed), dead leaves, wood chips, or pine needles, etc.
Be sure to remove the mulch once the bulbs begin to sprout in the spring.
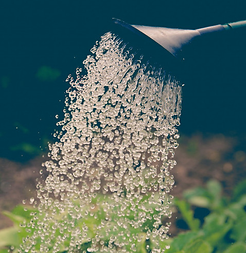
Watering
Water the cloves well after planting, making the soil evenly damp. Add more soil if needed to properly cover the cloves. There is no need to water them throughout the winter.
Once they begin to sprout, keep the soil damp but not soggy. The cloves will rot if there is too much water.
Fertilizer
While preparing the soil in your pot, add a slow release granular-based plant food and mix it into the soil. Then plant your cloves.
Sunlight
Garlic requires lots of sunlight. It must be placed in a location where it will receive at least 6 hours of sunlight daily. A south facing area is perfect for the northern hemisphere (north facing for southern hemisphere). If your kitchen is on the south facing side of your home and receives full sunlight, place the pot close to the kitchen door for easy access.
Check out the video below for how to grow garlic in containers outdoors.
How to Grow Garlic in a Pot – Indoors
Growing garlic indoors is a little more tricky than growing it outdoors. If you are growing garlic to produce another bulb, place only one clove in a 3 to 4 inch diameter pot that is at least 6 inches deep.
If you are growing garlic for its leaves and scapes, you can plant more than one clove in a pot, but be sure they do not touch and that the pot is deeper than 6 inches.
Planting the garlic cloves in the fall will produce bulbs that are ready to harvest in early to late spring. Be sure they receive enough sunlight.
- Choose an organic garlic, one that has not been sprayed to reduce germination.
- Select a variety of softneck garlic since they do better in a warmer climate.
- Place your garlic in the fridge for a few weeks to replicate its natural dormancy period.
- Select any container to be used as a pot, such as an emptied and clean ice cream container, coffee can, clay pot, etc. Just be sure they are thoroughly cleaned and have several drainage holes in the bottom.
- Place a paper towel or coffee filter in the bottom of the container to catch overflowing soil.
A Few More Directions For Growing Garlic Indoors:
The directions for planting cloves outdoors in pots can now be applied to growing cloves indoors, however, there are just a few other things you need to do to produce bulbs and/or scapes inside.
1. Place the pot in a south or west facing window (opposite in the southern hemisphere) to ensure the plant gets at least 6 hours of direct sunlight. This may be a little difficult since the days are much shorter in the winter.
2. Keep the soil evenly moist. Since the air is dryer inside than outside, the cloves will need to be watered more frequently. But do not allow the soil to become soggy.
3. Do not place them in an area with lots of humidity like a bathroom. The plants prefer a more arid environment and do not like humidity, but enjoy moist soil.
4. Use a natural based fertilizer or compost to fertilize the plant.
5. You do not need to add mulch to containers if growing the garlic inside.
6. Harvest when the stems turn yellow and slightly brown. Do not leave them in the container too long or they will dry out.
For more information on harvesting garlic and storing your bulbs, read How to Grow Garlic From Bulbs.
If you are just snipping the leaves and scapes and not digging up the bulb, wait until they have grown at least 5 inches tall. Leave one inch of growth to guarantee more growth in the coming weeks.
Benefits of Garlic – The Healthy Vegetable
According to the Cleveland Clinic, there are many health benefits to using either garlic or garlic oil.
1. It improves your heart health. Garlic has been shown to improve your blood pressure and have a favorable affect on your arteries.
2. Garlic works as an anti-inflammatory. Rubbing garlic oil (sold on Etsy) on joints, cartilage and muscle can relieve pain and prevent damage from arthritis. You can also use a garlic salve (found on Etsy).
3. Eating garlic can boost your immunity.
4. Garlic has many antibacterial properties and antioxidants that can help clear up acne.
5. Rubbing garlic on food can help kill bacteria that causes food poisoning.
6. It can also be used to treat a fungus, like the one that causes athlete’s foot.
As with everything health related, consult your doctor before using garlic as a substitute for or with any prescribed medication.
Delicious Roasted Garlic
Roasted garlic is much easier to digest than fresh garlic, since roasting it changes its chemical makeup.
Once roasted, either eat it straight from the heads, add it to pasta dishes, mash it and spread on bread, or add it to sour cream to make a delicious dip.
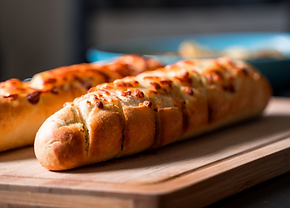
Garlic Bread
One of my favorite side dishes is to make garlic bread. You can make this by adding the meat from the roasted garlic to a loaf of crusty Italian or French bread and add some freshly grated parmesan cheese, drizzle with olive oil and sprinkle to taste with oregano and pepper.
Here is a simple recipe for Roasted Garlic Bulbs from Simply Recipes.
Ingredients:
- One or more heads of whole garlic
- Extra virgin olive oil
- Muffin tin or baking pan
Directions:
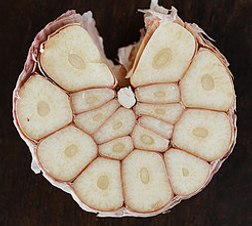
1. Preheat your oven to 400 degrees F.
2. Peel and throw away the outer papery covering of the garlic bulb.
3. Use a sharp knife and cut a quarter of an inch off the tips of the bulb.
4. Place the garlic bulbs in a muffin pan (preferred so the bulbs don’t roll) with the cut side up.
5. Drizzle a couple of teaspoons of oil over the heads and rub it all over the cut areas with your finger.
6. Cover the entire bulb with aluminum foil and bake for 30 to 40 minutes.
7. Allow them to cool to the touch and remove any excess paper from the bulb.
8. Squeeze out the roasted meat from the bulb.
Final Thoughts – How to Grow Garlic in a Pot
Garlic is a wonderful vegetable to eat all year round. It has numerus health benefits to keep you fit and strong. Follow these instructions and grow your own garlic and you’ll feel like an accomplished master chef!!
I hope you have enjoyed this article. Please share it with friends and family.
Please leave a comment below. I’d love to hear how you made out growing your own garlic in a pot!
